
(20, fig. 11-22)
to exhaust manifold as instructed in
(3) Push the throttle button (4) all the way in.
step c (5), preceding.
Start engine and pump water at open discharge. When
e. Fuel Line Replacement. If replacement of the
engine is fully warmed up, adjust the main mixture
adjustment needle for the highest pumping speed
flexible fuel line (19, fig. 11-20) is required, heat ends of
obtainable. Then, open the needle 1/8 turn more.
the new fuel line in a pot of boiling water until they are
soft. While soft, stretch ends over the fitting as required.
CAUTION
This softening is required only on new fuel lines. Once
The screws holding the governed
they are stretched, they will retain their shape.
speed adjust clamp (2) should never
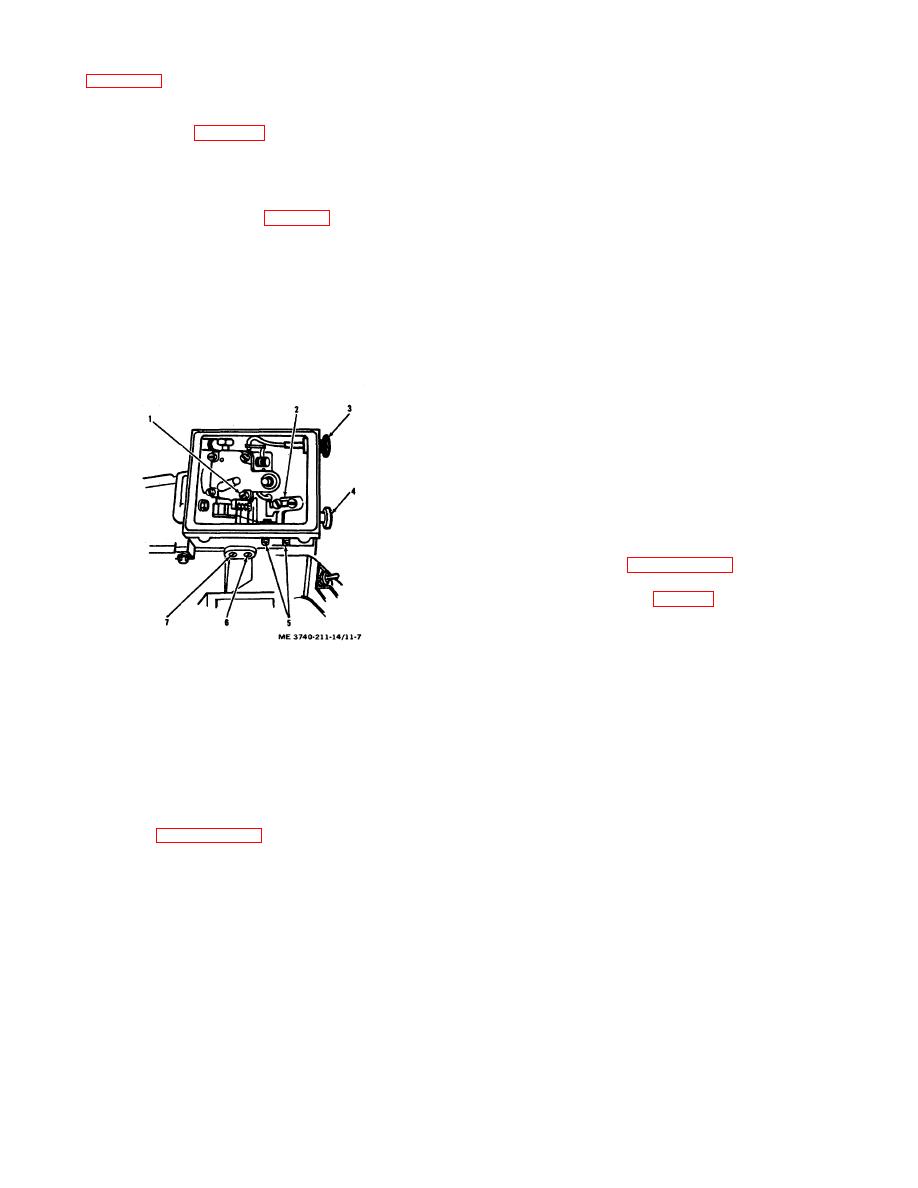
f. Carburetor Adjustment (fig. 11-7).
be loosened, except by direct support
or general support personnel with
Note:
proper test equipment available.
Before changing the carburetor mixture
(4) Pull the throttle button (4) all the way out,
adjustments, be sure the tank is full of
and adjust the idle mixture adjustment needle (7) for the
clean, fresh, properly mixed fuel. Then
smoothest and highest speed obtain-able. If this speed
clean the air filter, and leave the filter
is either too high or too low, adjust speed by means of
and cover off until the carburetor has
the idle speed adjustment screw (1).
been adjusted.
Note:
Because main and idle mixture
adjustment needles are interdependent,
some readjustment under full load
conditions may be necessary.
(5) Recheck adjustments under full load
conditions as in steps (2), (3), and (4), preceding. Be
sure settings are correct before reinstalling the air filter
and cover.
(6) Reinstall air cleaner filter element and
g. Removal and Replacement of Hoses, Couplings,
Strainer, and Ball Valve (fig. 11-1).
(1) All threaded connections of the pump (1),
hoses (8), couplers (4), strainer assembly (11), ball valve
(2), and valved nipples (5), use pipe threads. Removal
and replacement procedures are therefore identical for
1. Idle speed adjustment
5. Throttle rod adjustment
each. To remove, use a pipe wrench, strap wrench, or
screw
screws
vise to hold one part, while unscrewing the mating part
2. Governed speed adjust- 6. Main mixture adjustment
with a second wrench.
ment clamp and screws
needle (HI)
3. Choke button
7. Idle mixture adjustment
(2) Disconnect mated valved couplers by
4. Throttle button
needle (LO)
pulling back the retaining ring of the female half of the
coupler, and pull the coupling halves apart.
Figure 11-7. Carburetor adjustment controls.
(3) Clean threads of all components before
reattaching. Remove all dirt, spray fluid residue, tape, or
(1) Remove and clean the air cleaner element
(4) Apply a new layer of Teflon tape per
CAUTION
Military Specification MILT-27730, to pipe threads before
Use care when adjusting needles not
reattaching.
to jam needles in their orifices.
(5) Connect mating parts and screw down
(2) Very gently turn the idle mixture
fairly snug. Since pipe threads are tapered, it is not
adjustment needle (7), and the main mixture adjustment
necessary to overtighten them. However, do not back
needle (6) until they just close against their seats. Then
threads off from their tightest position, as a leak may
open both needles one turn from the gently closed
occur.
position.
11-12
