TM 1-1510-218-10
3-34
NOTE
The KLN 90B flight plan operation is
designed so that the first waypoint in the
flight plan should always be the departure
point. A four-character identifier, if
available, must be used.
5. Use the left inner and outer knobs to enter
the entire identifier.
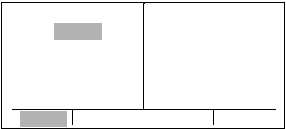
6. Press the ENT button. A waypoint page
for the identifier just entered will be
displayed on the right side. Refer to
Figure 3-37. If a mistake was made and
the wrong identifier was entered, press the
clear button and begin again. If the
waypoint identifier just entered isn't in the
database, a page allowing the creation of
a user-defined waypoint will appear on the
right.
APT 1
KNEW
LAKEFRONT
CL C
N 30o 02.53’
W 90o 01.69’
USE? INVRT?
1:KNEW
2:
E N R - L E G
CRSR
E N T
Figure 3-37. Flight Plan and Waypoint Page
(1) Press the ENT button again to approve
the waypoint page being displayed. The cursor will
move to the second waypoint position. Refer to Figure
3-38.
NOTE
A small number of waypoints are stored in
the
database
as
waypoints
that
the
governing
agency
has
decided
it
is
important to fly directly over instead of
using turn anticipation. These waypoints
are associated with SID/STAR procedures.
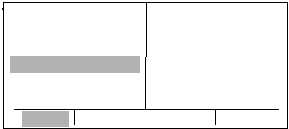
In these cases, the KLN 90B will present a
waypoint type identification page. Simply
select the way in which the waypoint is
intended to be used with the left outer
knob and press the enter button. If the SID
/ STAR choice is selected, the KLN 90B will
disable turn anticipation for that waypoint,
if previously enabled. The KLN 90B will
enable turn anticipation after the waypoint
has been passed, if turn anticipation was
previously enabled. If en route is selected,
then normal turn anticipation occurs.
SWR
TYPE WPT
1 EN ROUTE?
2 SID?STAR?
VOR
SWR D
SQUAW
VALLEY L
113.20 16o E
N 39o 10.82’
W120o 16.18’
E N R - L E G
CRSR
E N T
Figure 3-38. Waypoint Type Identification Page
(2) Use the same procedure to enter the rest
of the waypoints in the flight plan. If the flight plan
consists of five or more waypoints, the waypoints will
automatically scroll as necessary to allow entry of the
next waypoint.
(3) When all of the waypoints have been
entered in the flight plan, the left outer knob may be
rotated to move the cursor up and down and manually
scroll through the waypoints making up the flight plan.
If the flight plan consists of six or more waypoints, not
all of the waypoints can be displayed at one time.
When the left outer knob is rotated to the full
counterclockwise position, the cursor will be positioned
over USE?. If there are more than five waypoints in
the flight plan, the first four will be displayed followed
by the last waypoint in the flight plan. Rotate the left
outer knob to move the cursor and manually scroll
through the intermediate waypoints.
(4) Press the left CRSR button to turn off the
cursor function. Additional flight plans may now be
created in the same manner.