TM 1-8415-216-12&P
NOTE
Removing the lining, helmet, shock (EAL) may
require some practice.
6. Inspect the lining, helmet, shock (EAL) in
accordance with Table 4-1 ; replace if
necessary following procedure 4-13a.
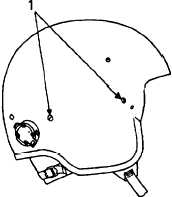
7. Referring to Figure 4-20, remove the re-
maining two pan-head screws (1), spring
washers, and posts attaching the strap
assembly, chin to each side of the helmet
shell.
8. Remove the entire strap assembly, chin
from the helmet.
Figure 4-20. Strap Assembly, Chin
Attachment Points
Installation
1. Attach the strap assembly, chin to the helmet shell by installing four screws,
washers, and posts at the attachment points indicated in Removal step 7.
2. Position the front edge of the lining, helmet, shock (EAL) between the nape
strap pad and the helmet shell at the rear of the helmet. Following the contour
of the helmet shell, slide the liner into the helmet until the front edge of the finer
is flush with the front edge of the helmet shell. Ensure that the hook-and-pile
fasteners are engaged.
NOTE
Ensure that the holes in the lining, helmet, shock (EAL) align with the
plenum openings for air cooling. In addition, the square hole should
be located to allow access to the strap assembly, chin mounting hard-
ware.
3. Reinstall the screw, washer, and post removed in Removal step 3.
4. Squeezing the sides of the lining, helmet, shock (TPL), reinstall it in the helmet
with the rear edge of the lining, helmet, shock (TPL) aligned with the top edge
of the nape strap pad. Ensure that the nape hanger strap is taut and the hook-
and-pile fasteners are engaged.
5. Reinstall earcups and check fit.
4-23