TM 1-1510-225-10
3B-153
Table 3B-87. UHF MWOD List Selection and Loading (Continued)
NO.
DESCRIPTION/FUNCTION
7
Load the MWOD list into the corresponding V/UHF radio.
8
Return to the V/UHF HAVE QUICK setup page.
(j) Loading
Frequency
Management
Training (FMT) Lists. An FMT list can be created
manually using the V/UHF FMT Load pages or loaded
from the data cartridge. Refer to Figure 3B-125 and
Table 3B-88. To load each FMT element into the FMT
list manually, access the FMT Load pages as shown in
Figure 3B-125. Finally, to load the FMT list into the
V/UHF radio, press the ENTER line select key on any
of the V/UHF FMT Load pages. When an FMT list is
successfully loaded into the V/UHF radio, the radio will
acknowledge each FMT element load with a short
tone, ending with two headset beeps.
NOTE
FMT elements can be manually entered or
loaded from the data cartridge.
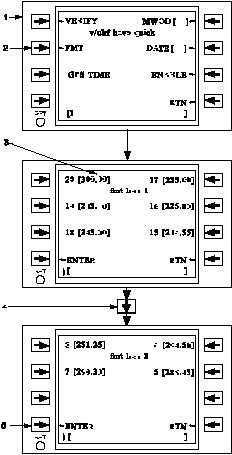
Figure 3B-125. V/UHF FMT List Selection and
Loading
Table 3B-88. V/UHF FMT List Selection and
Loading
NO.
DESCRIPTION/FUNCTION
1
Refer to Figure 3B-130 for details on how
to access the V/UHF 1 HAVE QUICK
setup page.
2
To access FMT load 1 page.
3
Element 20 must be set to 300.0xx (xx
can be any two digits) for an FMT list.
4
Scroll to the V/UHF FMT load page 2 and
3.
5
Load the FMT list into the corresponding
V/UHF radio.
(k) Entering Active MWOD Date. To set
the V/UHF radio to the desired date and enable the
MWOD list for the given date, enter the date in the
scratchpad (one or two digits representing the
calendar day of the month) and press the DATE line
select key on the V/UHF HAVE QUICK II Setup page.
The V/UHF radio will acknowledge the load with one
headset tone Figure 3B-126 and Table 3B-89.
The VERIFY line select key on the V/UHF HAVE
QUICK II setup page performs two functions: it verifies
WOD's have been entered for a given date, and
performs a reset function by taking the V/UHF radio’s
HAVE QUICK computer off-line momentarily. To verify
WOD's are loaded for a given date, enter the date in
the scratchpad and press the VERIFY line select key.
To reset the HAVE QUICK computer, ensure the
scratchpad is cleared and then press the VERIFY line
select key.
(l) HAVE QUICK Time Synchronization.
To synchronize the V/UHF HAVE QUICK radios,
access the V/UHF HAVE QUICK Setup page, and
select the desired synchronize mode. Select GPS
TIME to synchronize the radio to GPS UTC. Select
RECV TIME or SEND TIME to receive or send a time
synchronization from another radio. Select RESET
TIME to reset the internal clock when no other time is
available. Activate the time synchronization by
pressing the ENBLE line select key.