TM 1-1510-223-10
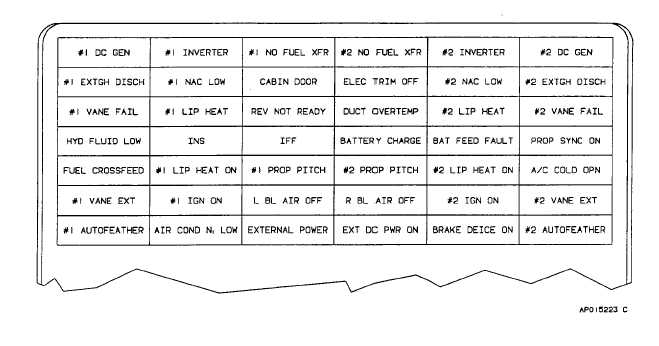
Figure 2-37. Caution/Advisory Annuciator Panel
(4) The MASTER light switch is ON and the
PILOT INSTRUMENTS LIGHT switch is OFF.
f.
Master
Warning
Annunciators
(red).
Two
MASTER WARNING annunciators, one located on each
side of the glareshield (fig. 2-16), are provided to alert
the crew of a hazardous condition. Any time a warning
annunciator
illuminates,
the
MASTER
WARNING
annunciator will flash, and will remain flashing until the
MASTER WARNING annunciator is reset If a new
condition occurs, the annunciator will be reactivated, and
the applicable annunciator panel annunciator(s) will
illuminate.
g.
Master Caution Annunciators (amber). Two
MASTER CAUTION annunciators, one located on each
side of the glareshield, adjacent to the MASTER
WARNING annunciator (fig. 2-16), are provided to alert
the crew of a situation requiring the crews attention.
Whenever
a
caution
annunciator
illuminates,
the
MASTER CAUTION annunciator will flash, and remain
flashing until the MASTER CAUTION annunciator is reset
If a new condition occurs, the annunciator will be
reactivated and the appropriate annunciator(s) will
illuminate.
h.
Clocks.
(1) Description. A digital quartz chronometer is
mounted in the center of both control wheels (fig. 2-22).
Each quartz chronometer is a five-function clock/timer
that is controlled by three pushbutton switches, located
directly below the six-digit liquid crystal display.
(2) Operation. The MODE button is pressed to
select the desired mode of operation. The mode
annunciator is displayed above the mode identifiers, and
advances to indicate each of the following modes:
LC - Local Time
ZJ - Zulu or Greenwich Mean Time
FT - Trip or Flight Timer
ET - Elapsed Time
DC - Downcounter with Alarm
(3) Local time mode (LC). Press the MODE
button to advance the annunciator to LC To set the hour,
press the RST button once, then press and hold the ADV
button until the correct hour is displayed. To set minutes,
press the RST button again, then press and hold the ADV
button until the correct minute is displayed. Press the
SET button once to display and hold the selected time.
Press the ST - SP button to resume clock operation
and/or synchronize the display with a selected time
standard.
2-81