TM 1-1510-225-10
3B-60
Table 3B-14. Start 2 Navigation/ Initialization
Procedures
NO.
DESCRIPTION/FUNCTION
1
Press
Left
Line
Key
1/Command
initialization.
2
Press Scroll Key/Scroll to Start page 3.
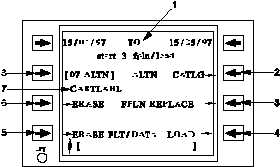
3. Scroll to the Start 3 page and verify
the effectivity date of the
ICAO
database is correct. Refer to Figure
3B-23 and Table 3B-15. If a new flight
plan and mission data are to be
entered
manually,
select
ERASE
FPLN. If a new plan is to be loaded
from the cartridge, first enter the
desired flight plan number or access
the Alternate Flight Plan Catalog and
select the desired flight plan (requires
confirmation – select twice). After
loading is complete, select FPLN
REPLACE.
This
transfers
the
alternate flight plan data into the
active flight plan so that both plans are
identical at the beginning of the
mission. The crew may select FLT
/DATA LOAD to load all remaining
preplanned mission data, including the
radio presets, V/UHF Have Quick II
MWOD's,
FMT's,
SINCGARS
net
identifiers, and user waypoint and
markpoint lists.
4. Access
the
Navigation/
Communication
Radio
Information
pages to view the desired presets and
channels for each radio.
5. Access the Status pages for all LRU's
and
confirm
the
current
status
conditions,
including
bus
status,
indicate GO for all LRU's.
6. To prepare the FMS for recording the
fault history of the flight, access the
data Loader pages and select the
STAT SAVE line select key twice.
This resets the date and time stamped
to the current day and time and
initializes the fault history record.
7. Configure the system for desired
behavior and performance.
NOTE
Position, time, and date are periodically
updated with GPS data when it is valid.
The Start 1 Page is initially displayed
following FMS startup.
Figure 3B-23. Start 3 Flight Plan/Load Page
Table 3B-15. Start 3 Flight Plan/Load
Procedures
NO.
DESCRIPTION/FUNCTION
1
Effectivity dates for ICAO identifier
database.
2
Select for catalog of available alternate
flight plans.
3
Replace the active flight plan with the
alternate flight plan.
4
Load mission data from data cartridge.
5
Erase mission data.
6
Erase flight plan.
7
User
defined
data
cartridge
label
(defined at ground station).
8
Enter
desired
alternate
flight
plan
number or name.
(3) Navigational Chart Datums. The normal
global chart datum is WGS-84. The current system
datum is indicated on the Start 1 page.
(4) Initializing Configuration Functions.
(a) Time Annunciation. On the Start 1
page, select the UTC DISPLAY line select to enable a
continuous display of actual UTC time on the
annunciation line. Time will be continuously displayed
on the annunciation line when enabled. When higher
priority annunciations "hide" the time, press CLR to


