TM 1-1510-218-10
3-62
3. Use the left inner knob to enter
characters and the left outer knob
to move the cursor until the
identifier for the location is entered.
4. Press the ENT button to view the
waypoint page on the right side.
5. Press the ENT button again to
approve the entry.
6. Use the left outer knob to position
the cursor over CONFIRM?.
7. Press the ENT button.
NOTE
The groundspeed and heading fields are
not used for initialization in the aircraft. If
the KLN 90B is in the take-home mode,
entering a groundspeed will allow the KLN
90B to fly along the active flight plan (or
direct to a waypoint) starting from the
initialization waypoint. A heading may be
entered in the initial heading field while in
the take-home mode if the one offered is
not desired. If the take-home mode is
used, the KLN 90B must be initialized to
the aircraft's location when it is reinstalled.
8. Use the left knobs to select the
NAV 2 page. When the KLN 90B
reaches the NAV ready status and
is able to navigate, the NAV 2
page
will
display
the
present
position.
Verify
the
latitude,
longitude, and distance display of
the VOR radial are correct.
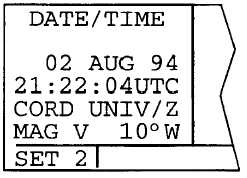
(3) The Setup 2 Page. Refer to Figure 3-81
for a sample page. The KLN 90B system time and
date should seldom require updating because they are
automatically updated when at least one satellite is
received. In addition, the KLN 90B contains an
internal battery powered calendar clock to keep
system time and date when the unit is not being used.
The correct time and date are normally confirmed on
the Self-Test page. The Setup 2 page can also be
used.
NOTE
The time and date cannot be changed if the
KLN 90B is receiving time and date from a
satellite.
Figure 3-81. SET 2 Page – Set Date
(a) Date.
1. Select the SET 2 page on the left
side.
2. Press the left CRSR button to turn
on the left cursor function. The
cursor will be over the entire date.
3. Rotate the left inner knob to select
the correct day.
4. Turn the left outer knob one step
clockwise to position the flashing
part of the cursor over the month.
5. Rotate the left inner knob to select
the correct month.
6. Turn the left outer knob one step
clockwise to position the cursor
over the tens digit of the year.
7. Use the left inner knob to select
the correct tens digit of the year.
8. Turn the left outer knob one step
clockwise to position the cursor
over the remaining position of the
year.
9. Use the left inner knob to complete
the year.
10. Press the ENT button to start the
KLN 90B using the new date.
(b) Time.
1. Select the SET 2 page on the left
side. Refer to Figure 3-82.


