T.O. 1-1A-9
2-300. VAPOR DEPOSITED COATING. Vapor deposited coating's are applied by exposing the base metal to a heated vaporized
metallix coating such as cadmium and aluminum in a high vacuum. The metal coating forms by condensation of the vaporized
coating metal on all exposed surfaces of the base metal. Vapor-deposited coatings can be obtained by processes in which a volatile
compound of the coating is reduced or thermally decomposed upon the heated surface of the base metal. Vapor deposited coatings
are used to provide good corrosion resistance for steel and eliminate sources of hydrogen embrittlement. Specific requirements for
coating, aluminum vacuum deposited, are cited in specification MIL-C-23217A; and for coating, cadmium vacuum deposited, in
specification MIL-C8837.
2-301. MECHANICAL-SURFACE FINISH . The following paragraphs are concerned with mechanical surface finish of the
geometrical irregularities of surfaces of solid materials and established classification for various degrees of roughness and waviness.
The surface roughness of a part is a measurement rating of the finely spaced irregularities, such as the surfaces produced by
machining and abrading (abrasive honing, grinding, filing, sanding, etc.) The roughness height ratings are specified in micro inches
as the arithmetic average of the absolute deviations from the mean surface. Profilometers and other instruments used to measure
surface height if calibrated in RMS (Root Mean Square) average will read approximately 11% higher on a given surface than those
calibrated for arithmetic average. Also associated with roughness high is roughness width, usually specified in inches and the
maximum permissible spacing of surface irregularities. As the arithmetic average of the absolute deviations from the mean surface.
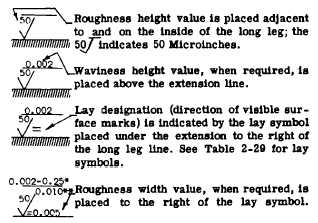
Waviness height rating (when required) may be specified in inches as the vertical distance from peaks to valleys of the waves,
whereas waviness width is the distance in inches from peak to peak of the waves. Figure 2-5 shows the meaning of each symbol
defined.
2-302. The symbol used to designate surface irregularities is the check mark as shown below.
*When waviness width value is required, the value may be placed to the right of the waviness height value.
**Roughness width cutoff value, when required, is placed immediately below the right-hand extension.
2-303. Designation of Surface Finish. Surface finish should be specified for production parts only on those surfaces which must be
under functional control. For all other surfaces the finish resulting from the machining method required to obtain dimensional
accuracy is generally satisfactory. The surface chosen (unless already designated) for a specific application will be determined by its
required function. Table 2-29 gives the typical normal ranges of surface roughness of functional parts. The values cited are micro
inches, for example 63T= 63 Micro inches or 0.000063 inches average deviation from mean.
TABLE 2-28. GALVANIC SERIES OF METALS AND ALLOYS.
CORRODED END ANODIC (LEAST NOBLE)
Magnesium
Tin
Magnesium Alloys
Nickel (active)
Zinc
Inconel (active)
Aluminum 7075 Clad
Brass
Aluminum 6061 Clad
Copper
Aluminum 5052
Bronze
Aluminum 2024 Clad
Titanium
Aluminum 3003
Monel
Aluminum 6061 T6
Silver Solder
Aluminum 7075 T6
Nickel (Passive)
Aluminum 7178
Inconel (Passive)
Cadium
Silver
Aluminum 2017 T4
Graphite
Aluminum 2024 T6
Gold
Aluminum 2014T6
Platinum
Steel or Iron
Protected End Cathodic
Lead
(Most Noble)
2-127


