TM 1-1510-225-10
7-2
c. Mission. Transport the following load
(personnel, baggage, and equipment) from Airport
Alpha to Airport Bravo:
Personnel – 6
(1) 185 pounds
(1) 160 pounds
(1) 200 pounds
(1) 155 pounds
(1) 170 pounds
(1) 190 pounds
Subtotal pax ….…1060 pounds
Baggage and Equipment –
(6) baggage @ 40 pounds = 240 pounds
(1) 24 x 24 box = 25 pounds
Subtotal baggage and equip = 265 pounds
Total load. 1325 pounds
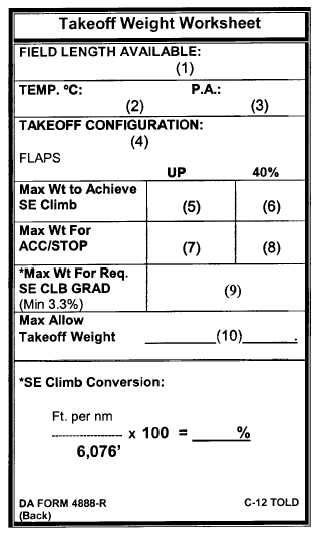
d. Performance Planning (Back of TOLD
Card). Refer to Figure 7-1. The back side of the
TOLD card is a takeoff weight worksheet. It is
designed to assist the crew in the decision making
process as to maximum allowable takeoff weight for
the conditions and the takeoff configuration. The
instructions herein are consistent with TC 1-218,
Aircrew Training Manual (ATM). Complete the card as
follows:
(1) Field Length Available is 6,000 feet.
NOTE
If the runway has an approved runway
overrun, that distance may be added to the
runway
length
for
Accelerate/Stop
calculations.
(2) Temperature
(forecast
for
time
of
departure) is +30 C.
(3) Pressure Altitude (PA). To determine the
PA, add 1000 feet to field elevation for each 1.00 in.
Hg that the reported altimeter setting value is below
29.92 in. Hg, and subtract 1000 feet for each 1.00 in.
Hg above 29.92 in. Hg. First, find the difference
between 29.92 in. Hg and the reported altimeter
setting. Then, multiply the answer by 1000 to find the
difference in feet between field elevation and pressure
altitude. PA is inversely proportional to barometric
pressure, as the barometric pressure decreases the
PA increases and as the barometric pressure
increases, the PA decreases.
Pressure Altitude at AAA:
29.92 in. Hg - 29.72 in. Hg = 0.20
0.20 X 1000 feet = 200 feet
Because the barometric pressure is lower than
ISA, the PA will be higher than field elevation. The
pressure altitude at AAA is 200 feet above field
elevation.
Pressure Altitude at AAA = Field Elevation 3800
feet + 200 feet = 4000 feet.
(4) Takeoff Configuration, Flaps 0% or 40%,
will be determined by the crew after completing this
side of the TOLD card.
Figure 7-1. TOLD Card (Back)


