TM 1-1510-225-10
3C-43
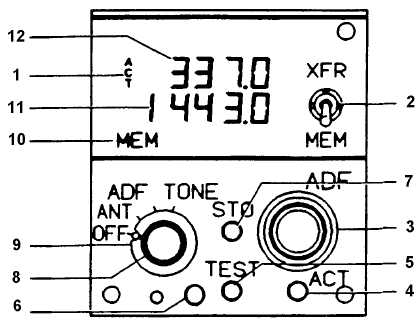
1. Compare Annunciator (ACT)
2. XFR/MEM Switch
3. Frequency Select Knobs
4. ACT Button
5. TEST Button
6. Light Sensor
7. STO Button
8. Volume Control
9. Power and Mode Switch
10. Annunciators (MEM, HLD)
11. Preset Frequency Display
12. Active Frequency Display
Figure 3C-19. ADF Control
(7) STO Button. The STO button allows up
to four preset frequencies to be selected and entered
into the control's memory. After presetting the
frequency to be stored, push the STO button. The
upper window displays the channel number of
available memory (CH 1 through CH 4); the lower
window continues to display the frequency to be
stored. For approximately 5 seconds, the MEM switch
may be used to advance through the channel numbers
without changing the preset display. Push the STO
button a second time to commit the preset frequency
to
memory
in
the
selected
location.
After
approximately 5 seconds, the control will return to
normal operation.
(8) Volume Control. A volume control is
concentric with the power and mode switch.
(9) Power and Mode Switch. The power and
mode switch contains four detented positions. The
OFF position removes system power. Selecting ANT,
ADF, or TONE applies power to the ADF system and
establishes the system mode of operation.
(10) Annunciators.
Displays
annunciator
fields.
(11) Preset Frequency Display. The preset
(inactive) frequency and diagnostic messages are
displayed in the lower window.
(12) Active Frequency Display. The active
frequency (frequency to which the ADF-60 is tuned)
and diagnostic messages are displayed in the upper
window.
c. Operating Procedures.


